How to install android 14? In February 2023, Google unveiled the initial developer preview of Android 14, with the stable release pending. As of September 20, the Android 14 QPR1 Beta is available and forms the basis for the upcoming December 2023 Pixel Feature Drop. To access the latest Android 14 build, this is the one you should choose. If you’re eager to try it out, you may wonder how to install it on your smartphone. This guide has you covered!
Is it a good idea to install Android 14?
Android 14 is in a pre-release state primarily for developers and early adopters. While accessible to the general public, be prepared for potential bugs, missing features, and unexpected issues. It’s recommended to install it on a secondary device rather than your primary one. The choice is ultimately yours to make.
Which phones can run Android 14 right now?
As of now, only recent Google Pixel devices can run Android 14. Here’s the list of supported phones for the latest beta:
| Google Pixel Fold | Google Pixel 7 Pro | Google Pixel 6 Pro |
| Google Pixel Tablet | Google Pixel 7 | Google Pixel 6 |
| Google Pixel 7a | Google Pixel 6a | Google Pixel 5a |
Unfortunately, if you have a Pixel phone released before the Google Pixel 5a, you won’t be able to install the latest QPR1 beta build of Android 14. However, if you own a Pixel 4a 5G or Pixel 5 (apologies to Pixel 4a owners), you will receive Android 14 when the stable version is released.
Ways to install the Android 14 QPR1 Beta
Install with the assisted method
WARNING: This process will unlock your phone’s bootloader and erase all its data.
Make sure your computer has the necessary drivers for your phone, which you can obtain from Google’s Pixel drivers page. This step is crucial; skipping it will prevent the flashing process from working.
- Connect your phone to your computer using a USB cable.
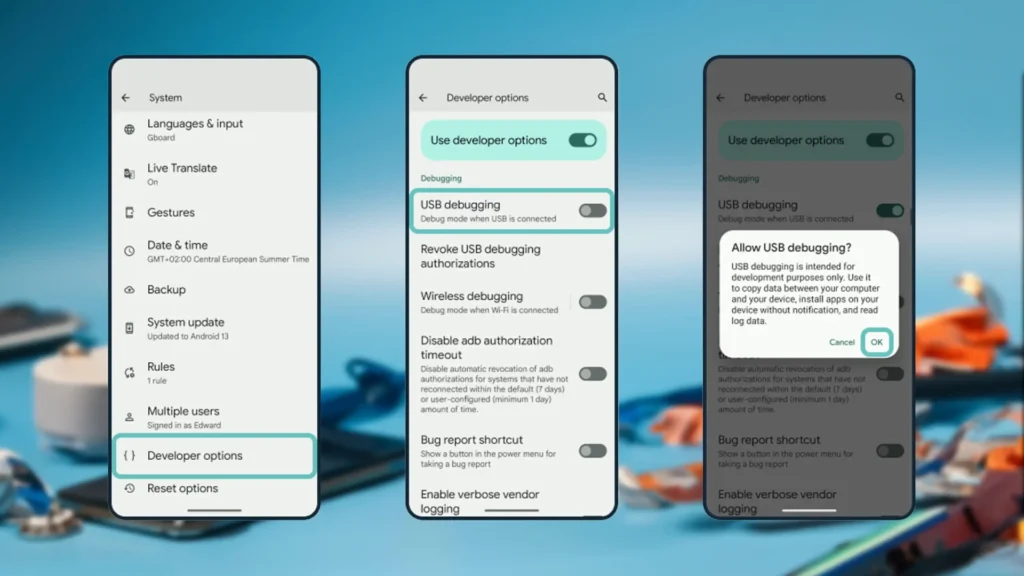
- On your phone, navigate to Settings > System > Developer options. If you can’t find Developer options, go to Settings > About phone and tap on the Build number seven times to become a developer. Developer options should now be accessible.
- In Developer options, enable both OEM unlocking and USB debugging.
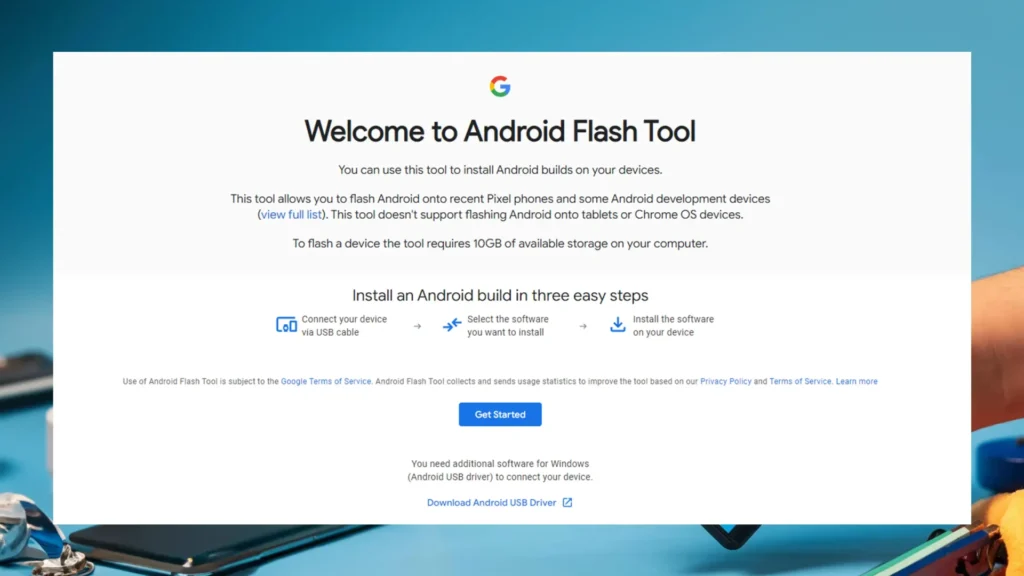
- Go to the Android Flash Tool page to install Android 14.
- Choose the version of Android 14 you want to install. Some models offer a 64-bit-only version and one that supports both 64-bit and 32-bit software. If you’re unsure, select the one labeled “(signed),” which supports both.
- Follow the instructions provided by the flashing tool closely. Do not interact with your phone unless explicitly directed to do so by the flashing tool.

That’s it! You should now have Android 14 successfully installed on your Pixel smartphone.
Manually Install Android 14
Follow these steps, which are common regardless of the installation method you choose:
1. Install ADB and Fastboot:
Begin by installing ADB (Android Debug Bridge) on your computer. You can follow a guide to install ADB, which also includes Fastboot as it’s part of the Android SDK Platform Tools along with ADB.
2. Enable USB Debugging on Your Phone
- On your smartphone, go to Settings > About Phone.
- Find the “Build Number” entry and tap it seven times. You’ll see a message like “You are now a developer” or “No need, you are already a developer.” This means you’ve unlocked Developer Options.
- Now, navigate to Settings > Developer Options and enable USB Debugging. Confirm your choice when prompted with a warning.
- Install Phone Drivers: Make sure your computer has the appropriate drivers for your phone. You can download these drivers from Google’s Pixel drivers page.
- Connect Your Phone: Connect your phone to your computer. If it’s your first time connecting, your phone will prompt you for authorization for the connection. Grant it.

Once you’ve completed these common steps, you can proceed with the rest of the tutorial based on the specific installation path you choose.
To sideload OTA updates via ADB:
- Download the correct OTA update zip file for your phone.
- (Optional but recommended) Rename the file for simplicity.
- (Optional but recommended) Verify the SHA-256 checksum.
- Move the file to the ADB directory on your computer.
- Connect your phone to your computer.
- Reboot your phone into recovery mode using adb reboot recovery or manually.
- Select “Apply Update from ADB” on your phone.
- Confirm the ADB connection with adb devices.
- Sideload the update using adb sideload filename.zip.
- After installation, choose “Reboot system now” on your phone to start Android 14.
To flash Factory Images via Fastboot:
WARNING: This process erases your phone. Backup your data.
- Download Factory Images: Get the correct Factory Images for your phone model.
- Verify SHA-256 Checksum (Optional): Check file integrity.
- Unzip Files: Extract the files to your ADB and Fastboot directory.
- Connect Your Phone: Plug it into your computer.
- Reboot to Fastboot Mode: Run adb reboot bootloader.
- Unlock Bootloader: Execute fastboot flashing unlock. This wipes your device
- Run Installation Script:
- Windows: Double-click flash-all.bat.
- Mac/Linux: Run flash-all.
- Preserve Data (Optional): Edit the script to remove “-w” for data preservation.
- Finish Installation: Wait for the script to complete, and your phone will reboot into Android 14.
- Relock Bootloader (Optional): For security, reboot to Fastboot mode and run fastboot flashing lock.
Your Pixel smartphone should now have Android 14 installed.
Conclusion
Installing a new Android version can be a thrilling experience, but it comes with risks. Make sure you follow these steps carefully, and if you’re unsure about any aspect of the process, consider seeking assistance from the Android community or a knowledgeable friend.
Remember that installing Android 14 may not be officially supported by all manufacturers, and it can void warranties or even potentially brick your device if not done correctly. Proceed with caution, and enjoy exploring the exciting features of Android 14 on your compatible device!

