One of the most useful iTunes features is the ability to backup the data from an iPhone or iPad, in case you want to fix a specific issue or just keep your files saved.
However, there’s one big problem with this: the backup folder is kept on your PC, directly on the system drive. Therefore, if you’re that type of user who backs up things pretty often, you will end up with a very low amount of storage space left on your system partition.
In this cases, you need to change the iTunes backup location, moving the folder to a partition where you have more space. But Apple’s software doesn’t actually allow this, so…what should users do?
Is there any method of changing the iTunes backup location?
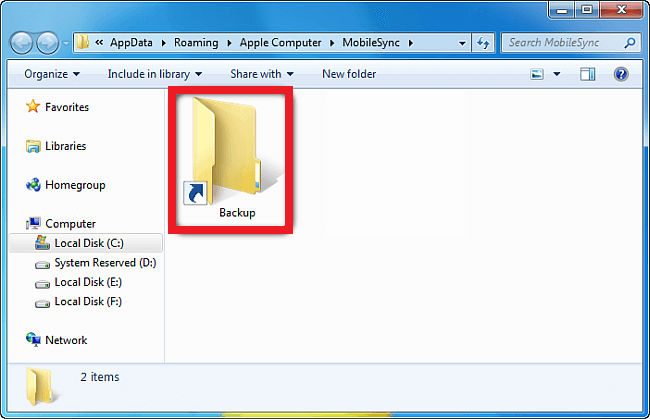
If you look into your system drive, you should see that the default destination of your iTunes backup folder is \Users\(your username)\AppData\Roaming\Apple Computer\MobileSync\Backup.
Basically, iTunes is configured in such way that all backup files are copied in this location, so it’s impossible to pick another location.
Therefore, the only solution to this remains creating a secondary backup folder, on another partition of your hard drive, for example, then link the original backup folder to it. Once this secondary backup folder is created, each time a new backup is added in the original folder, the files will actually be saved in the new folder.
Before going to the actual steps you need to follow in order to change the iTunes backup location, you should know that this is a relatively advanced process. However, if you follow the instructions in the guide carefully, everything should be ok.
How to create a secondary iTunes backup folder
- Pick another hard drive partition and create a new backup folder. It’s recommended to pick one with the most free space.
- Name the folder iTunes Backup 2 or anything that makes sense for you
- Go to the original iTunes backup folder and rename it. Let’s say iTunes backup 1
- Change the location of the iTunes backup folder. After renaming the original backup folder, press SHIFT and right click on the folder. You should see a menu
- Choose Open command window here. You should see a small window, with a black background and the following text on it:
C:\Users\(your username)\AppData\Roaming\Apple Computer\MobileSync>

- Type the following command:
mklink /J “%APPDATA%\Apple Computer\MobileSync\Backup” “D:\iTunes Backup 2”
In this command D:\ is the drive where the new folder is, but you can change it according to your location, while iTunes Backup 2 is the name of the new backup folder

- After this, the command prompt will create a link between the two folders and a shortcut called backup will also be created in the original location of the backup folder
- Go to the original backup folder and delete the old iTunes backup files
- Connect your iPhone to your PC and perform a backup with iTunes. You should now find the file in the new folder

At first, this method can look a bit complicated, but changing the iTunes backup location is actually a great idea since it can help you save a lot of storage space. Not once we’ve heard iPhone users complaining about having to back up their photos and videos way too often and ending up with low storage space on their system drive. By this, this problem can become history.
On the other side, you can skip the steps above and change the iTunes backup location using a third party tool. In one of our previous guides, we mentioned iExplorer, a tool which, among other features, can be used to save backup files from an iDevice on your PC.
You can use it for changing the location of the iTunes backup folder since its interface is very user-friendly and you shouldn’t have any problems during the process.
Otherwise, do let us know if the instructions above worked for you or if you’ve faced any issues, by dropping some lines in the comments section below!


Comments are closed.